
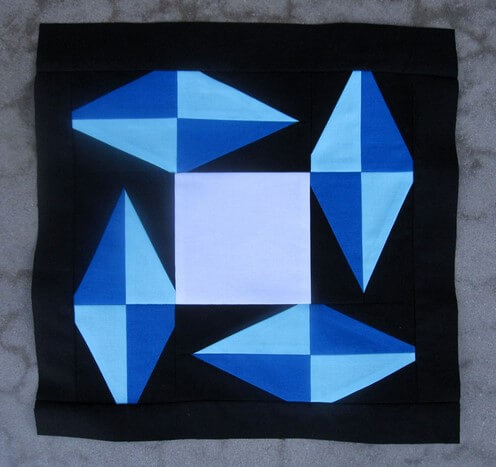
I need a little help with a block I worked on yesterday for the Modern Blocks Bee I am participating in. This is called Box Kite by Angela Pingel and you can see the original block here on her website. First go check out what the block should look like and then compare it with mine.
|
| Box Kite block by Angela Pingel from Modern Blocks by C&T Publishing |
My questions for you:
1. In the original block all four points of each individual "box kite" should come to a point, not cut off like mine are. What could I have done wrong to have these points cut off when I cut all of the fabric out correctly?
2. The "box kites" should continue all the way to the end of the 12.5 x 12.5 inch block - I added a black border to increase my block size to that dimension. Again, what did I do wrong?
I am looking for perfection but I want to understand what I did wrong so I can either make another block for my partner and/or learn for the next time. Any input you have would be appreciated.
I'm linking up with Sew Modern Monday and Manic Monday today. Please visit them both!


Thanks everyone! Have a safe and productive Monday,
Susan
Nice colors! Usually, of course, the first thing to check is 1/4" seam. Consider also if block designer uses a scant 1/4" in her design. A few threads difference can add up. Combo that w/ possibility that cutting on one side of line or another can change measurements a hair, and pressing thicker rather than thinner seams... As for overall block size, all the same issues would be in play. Hard for me to say absolutely since I'm doing this on cell and can't seem to access original block design. :-)
ReplyNice colors! Usually, of course, the first thing to check is 1/4" seam. Consider also if block designer uses a scant 1/4" in her design. A few threads difference can add up. Combo that w/ possibility that cutting on one side of line or another can change measurements a hair, and pressing thicker rather than thinner seams... As for overall block size, all the same issues would be in play. Hard for me to say absolutely since I'm doing this on cell and can't seem to access original block design. :-)
ReplyNice colors! Usually, of course, the first thing to check is 1/4" seam. Consider also if block designer uses a scant 1/4" in her design. A few threads difference can add up. Combo that w/ possibility that cutting on one side of line or another can change measurements a hair, and pressing thicker rather than thinner seams... As for overall block size, all the same issues would be in play. Hard for me to say absolutely since I'm doing this on cell and can't seem to access original block design. :-)
ReplyNice colors! Usually, of course, the first thing to check is 1/4" seam. Consider also if block designer uses a scant 1/4" in her design. A few threads difference can add up. Combo that w/ possibility that cutting on one side of line or another can change measurements a hair, and pressing thicker rather than thinner seams... As for overall block size, all the same issues would be in play. Hard for me to say absolutely since I'm doing this on cell and can't seem to access original block design. :-)
ReplyI agree with Sandy but it looks like even a 'scant' wouldn't give you those points back! So sorry I'm heading off to work & will check back in later....I'd triple-check your initial cutting.
ReplyHmm, I am not so good at playing detective like this, but I'm definitely intrigued! I think I may have to go try to make one of these blocks to see...And on a rather sad note, after looking through this book countless times I only just now realized that the blocks are in alphabetical order.
ReplyI just glanced at the pattern & I see it uses a template. I bet your template didn't print out at 100% - ??
ReplyYay for doing this block, Susan! I've been shying away from it because of all the seams. How accurate is your scant 1/4" seam allowance? That's been my challenge up until now. Also, as Debbie said, it could also be your templates (if you photocopied them or printed them out). Those are your two best bets for working out why this didn't turn out as you expected. Love the colours!
ReplyPretty much what everyone said up above... check seam allowance, check the printing scale. Sometimes you can even lose a bit ironing. But ya know, if you hadn't told me what it was supposed to look like, I never would have known there was a problem. It's beautiful as is too! What a neat block!
ReplyWith the exception of the center block, all the other blocks in the 9 patch need to extend 1/4" beyond the "point". Her blog says it's paper pieced in sections, so you may want to check to see that the paper piecing template is printing out to the correct size of 4-1/2 for each part of the 9 patch and if not, scale it up/down.
ReplyGood luck!
I am wondering if the block was "tested" by the designer. The point that did not get cut-off has more than 1/4" from the point to the seam, yes? Or no? At the very least, the points that were cut-off must have been too close to the seam line. It is hard to tell in 2D. I am thinking the piece with the star was designed too small. This happened to me once and if you figure it out - let us know!
ReplyI agree with Kelly. Did she "test" her pattern instructions? Did she not include seam allowances in her measurements? You know how to sew a 1/4" seam so I don't suspect it has anything to do with that. I think it was pattern "issues".
ReplyHave to agree with everyone so far...
ReplyOne thing I like to do with a pattern like this is to make the rectangles that have the black and blue triangles a bit larger than what is called for and then trim them down to size.