Wednesday, February 29, 2012

WIP Wednesday: A School Yard Finish

Although I showed this to you yesterday, here is my grand finale post shouting out to the world that I've finished a quilt!

School Yard
The Details:
School Yard
Pattern: Square One from Simplify with Camille Roskelley: Quilts for the Modern Home .
Fabric: Punctuation by American Jane for Moda Fabrics - top, back & binding.  Sashing on top is Snow Bella Solids.
Size: 61" x 53"
Pieced and bound by me
Quilted by: Karen Kimmel - a long arm quilter from my guild who brought life to this quilt.
Started: January 2011
Finished: Sunday, February 25, 2012
Who is it for: Initially this quilt top had no intended recipient, but sometime in the middle of last year I participated in a Crafty Pay-It-Forward Challenge on Facebook and a lovely Kindergarten teacher friend of mine played along.  So School Yard is for her and it will go perfectly in the decor of her house.

Here are a few more photos:


What else am I working on:
The T-Shirt Quilt - plan to post T-Shirt Chronicles Part III by the weekend.
Sew Happy Quilt QAL - a week behind...need to catch up.
Mug Rugs - yesterday in class I doodled a bit and designed a thank you mug rugs for various friends & family who've been very supportive this past three weeks.

I'm linking up with Lee from Freshly Pieced for WIP Wednesday and Jenna from Sew Happy Geek for Manic Monday.

Happy Leap Year Day - hope you have a fun and productive day,
Susan

Tuesday, February 28, 2012

T@tT: PBCC Cookies & A Quilt Finish

I love to bake cookies.  Cookies, to me are instant gratification - Ingredients on hand, mix in a bowl, bake them up and enjoy.  The classic Tollhouse Chocolate Chip cookie recipe takes me about 20 minutes to go from ingredients in the pantry to a hot cookie on the counter.  I have vivid memories of my mother teaching me how to make them when I was so young that I had to stand on a stool to see over the counter.  I was such an active child (not unlike now) that I was always falling off that stool and boy would she scold me to "calm down".  I treasure those those memories.

Peanut Butter Chocolate Chip Cookies
Sunday night while watching the Academy Awards (in between commercials), my younger son and I made Peanut Butter Chocolate Chunk Cookies.  This is a Hershey Kiss recipe (go here for the recipe) which after the cookies comes out of the oven, an unwrapped Hershey Kiss is placed in the center while the cookie is still hot.  So fun to come back two minutes later or so and see how the bottom part of the chocolate has melted into the cookie but the top of the chocolate retains it's shape. As you can see from my photo those are not Hershey Kisses - I actually had two huge Hershey Kisses on hand so I chopped them up and placed big chunks into the cookies.  By the way, as my younger son is a male version of me, guess who is telling him to "calm down" in the kitchen?  Too funny.

Huge quilting news....Last night I finished a quilt!  I'll have all the details and better photos tomorrow but for now here is School Yard!

School Yard - 61" x 53"

My quilter did an amazing job. 
A label!  Now I just have to write on it.  
I'm linking up with Debbie at her Tuesday at the Table Feature...she posted about Hostess Cupcakes!  Silly me giving up sweets for Lent...I want one of her cupcakes NOW.  I'm also linking up with Fabric Tuesday at Quilt Story - go see what others have linked up to today.

Yea it's a school day for me!
Enjoy your Tuesday,
Susan

Wednesday, February 22, 2012

Work-In-Progress Wednesday: A Quilt Along

I am currently participating in Jenna's Sew.Happy.Quilt.Quilt Along and when I say participating I mean that I am actually keeping up!  She posted Block 10 yesterday in which I will get to by the weekend but for now here are Blocks 1-9:
Blocks 1-9: a bit crooked
Block 8:
Diamond Peek A Boo

Block 9: Like the design but not my fabric choices...may do this one over. What do you think?
Churn Dash Redux
A shot of all nine inspired by Debbie:
Two more items:
I'm picking up my School Yard quilt from a local quilter tonight.  Cannot wait to see it, sew the binding on and have a finish.  
I start mentoring today.  I'm nervous and at 6am already have a stomach ache but I know I will do fine once I'm there.  

I'm linking up with Lee at Freshly Pieced today for the first time in ages! 
Enjoy your Wednesday,
Susan

Tuesday, February 21, 2012

The Upward Turn & Cooking Salmon On The Stove Top

In 1969 Elisabeth Kubler-Ross published On Death and Dying where she introduced 
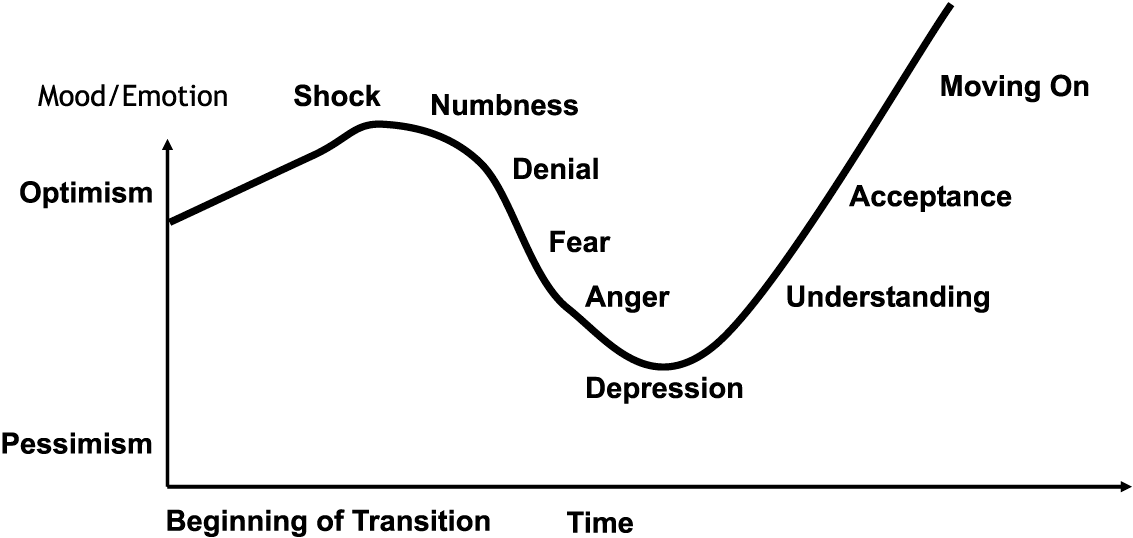
The Five Stages of Grief model explaining the five different stages that one goes through on their journey toward acceptance of a loss or change. These stages are not chronological nor are they a one way progression as one can vacillate from one stage to another, skipping some altogether.

As this is a history blog I felt like sharing with you where I am right now in my progression - see that graph above?  I'm definitely on the upward turn of that line which to me sounds so positive and hopeful - something that helps me in my transition to my new life without my father.  I've skipped a few of those emotions on that downward slide - maybe I'll slide back, maybe I won't but for now I am looking up.  

Onto the food!  

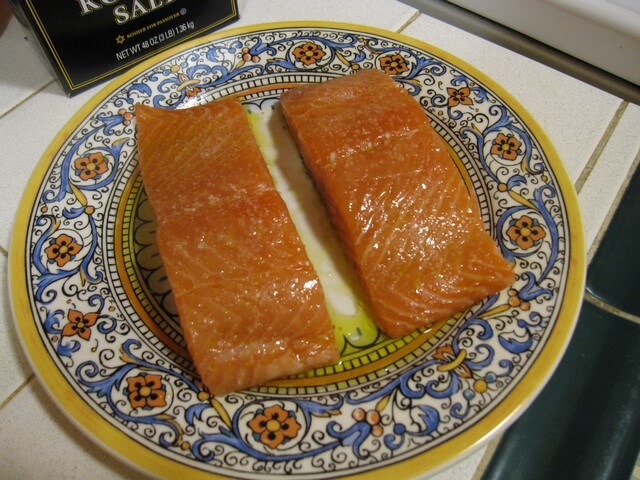
Yesterday afternoon I was inspired to try a new method of cooking salmon to help out a friend who was looking for a health way to cook fish on the stove top.  I love salmon and prefer it cooked on the BBQ with just a light covering of olive oil and kosher salt which leads to a crispy exterior and a creamy/buttery interior.  

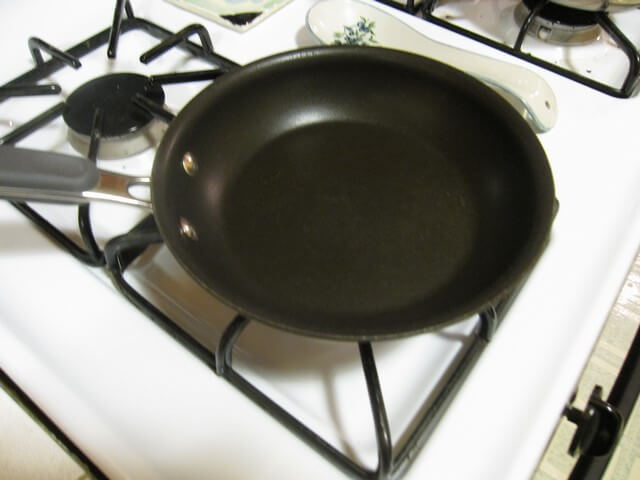
As I began thinking about my meal, I thought how could I replicate the BBQ effect on the stove top?  I started with the pan - no cast iron or Calphalon for this project.  I went for my small nonstick pan as I wanted to eliminate all possibility of the fish sticking to the pan.  

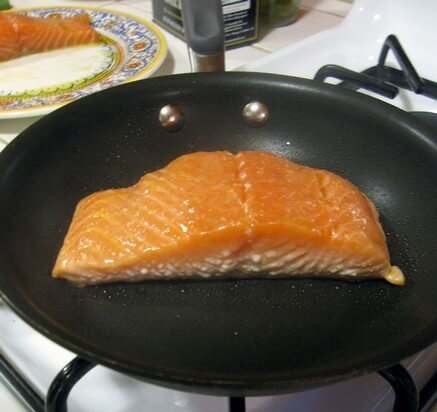
Then I prepped by salmon just as I would for the BBQ - a light covering of olive oil with a sprinkle of kosher salt on the top.  

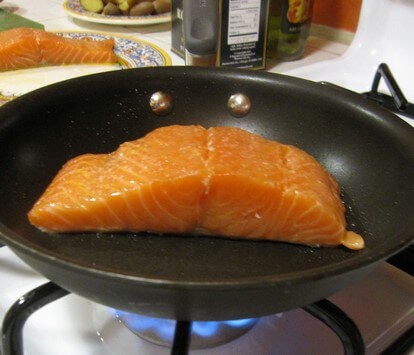
With the pan heated up to a level four (out of ten), I laid in one of the salmon steaks, skin side down.  The majority of the cooking is done with the skin side touching the heating element (pan, BBQ, etc.) as it is a natural protector to keep the fish from burning. 

Now it's time to wait patiently for the salmon to cook.  No turning, no fiddling, just waiting.  

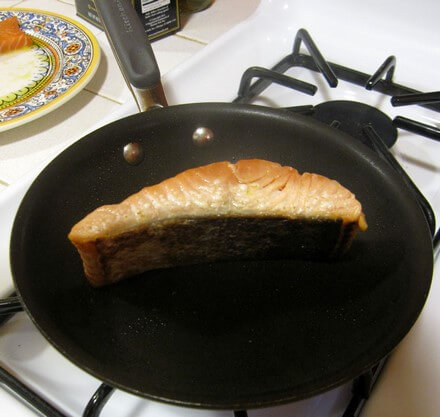
With the photo above you can see that I've just added the salmon to the pan.   About five minutes later it looks like this.  See how the bottom layers of the salmon are turning a pale peach color and losing the translucent salmon color? 

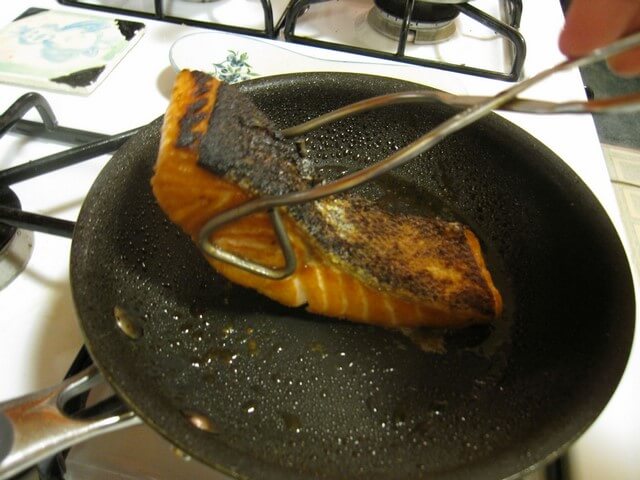
When it looks like the cooking is halfway up the steak, the steak is very close to being done.  Now it's time to turn the steak in order to finish cooking the sides and top and to give it a little color/crunch.  
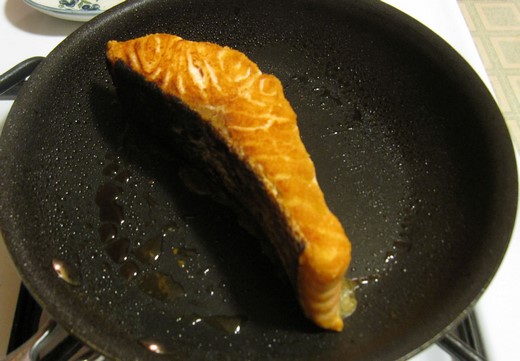
Pick a side and turn it.  It should sit right up without falling over as mine did.  Let it stay here for about a minute. The sizzling you will hear will result in the exterior crunch.  Then turn it over.  

 Wait another minute on the other side and then place it face down on the pan. At this point the salmon is done and only needs a few seconds face down to give it some color per your preference.  
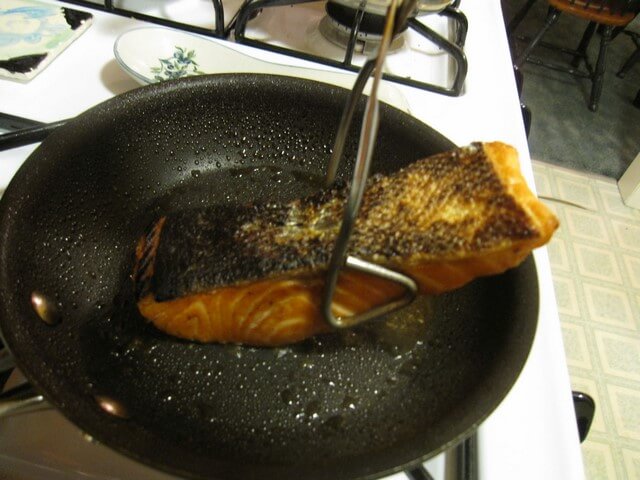
This is where you need to help your salmon steak out a little - see how it doesn't sit flat?  A little yoga pose inspiration is needed here - Use your tongs for a little upward facing dog:
 
And a little downward facing dog:

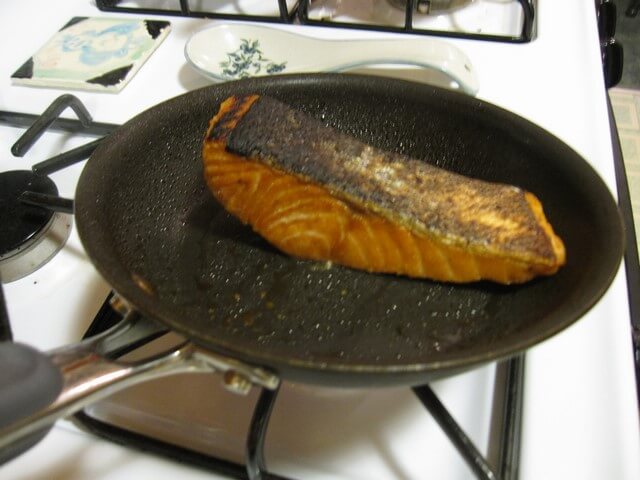
I know, silly...but I'm in a good mood so I'm going with it. You end up with this...
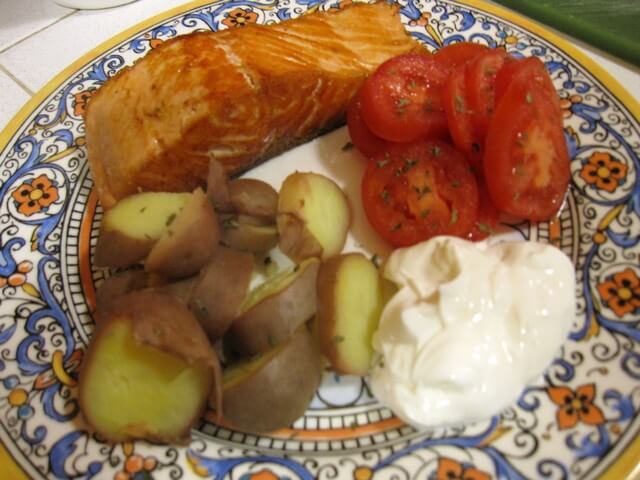
I was very happy with the result as the salmon had that exterior crunch that I adore along with the creamy/buttery interior.  The salmon cooked for maybe eight minutes max- talk about a fast and healthy main part of a meal.  With some fresh sliced tomatoes, gently boiled potatoes and greek yogurt my meal was complete.  

Have a great day everyone~
Susan

Tuesday, February 14, 2012

T@tT: Comfort Foods - Spaghetti Bolognese

After a week of take-out, yogurt and peanut butter sandwiches, I went back into my kitchen yesterday afternoon and cooked for comfort. Cooked to soothe, cooked to remember and cooked to forget.  It helped.

I wanted pasta and I wanted it from Marcella Hazan.  She lives on a canal in Venice, Italy and cooks....lucky lady.  I could be very happy living on a canal in Venice, walking the local streets every morning to the market to buy food, greeting my neighbors in Italian along the way.  If you have a chance, listen this this NPR story about her from 2010 - here.
My boys and I on a canal in Venice, Italy 2006
Spaghetti bolognese is rather simple: a mirepoix of onion/carrot/celery, ground chuck, white wine, whole milk, a dash of nutmeg, tomatoes and S&P.  The process of gently cooking the mirepoix to the right temperature/ consistency and then waiting for both the milk and then wine to reduce down takes the longest in terms of hands on time.  Once you add the tomatoes, you stir and walk away.  Bolognese needs a long time to gently simmer on the stove and Marcella's recipe calls for three hours - I started early and let mine simmer for five. Go here for the recipe.


Everyone was happy to have a home cooked meal in front of them when I called them to the table and it pleased me to watch them dig in and go back for seconds.  The spaghetti bolognese was warm and comforting - just what I needed to soothe myself at the end of the day.

I'm linking up with Debbie's Tuesday at the Table feature - go see the cookies she has posted about today - they look fabulous!

Ciao~
Susan

Friday, February 10, 2012

Unexpected Life Changes

For the last eleven years I have been a caregiver, first to my mother and then to my father after she passed away. I embraced this role gladly without reservation nor resentment as I felt it was just something I was supposed to be doing - caring for my parents.

Suddenly without warning this past Monday afternoon I was no longer a caregiver. My father passed away in his own home and on his own terms - the best possible scenario for him.

I am heartbroken and missing my father so much I can hardly bear it. He was an integral part of my daily life as I was always thinking about him, talking to him on the phone and seeing him around town on his little red scooter: in Trader Joe's, in front of the local donut shop or even on campus at CSULB. I always enjoyed how he would light up when he realized it was me walking toward him when we met outside of our homes. He'd call out to the nearest stranger, "look- here's my daughter, my very own daughter!".

I have no regrets, only sadness that it will be a very long time before I see him again but am comforted by the thought that he is now back together with my mother.
Bill & Jean
Bear with me here while I take the time to get back my crafting/cooking/blogging mojo.
Take care,
Susan

Sunday, February 5, 2012

Quilt Block Makeover: Before and After

Don't we all love before and after photos?  Makeovers on people, homes, landscapes or restaurants -  we get the condensed "wow" factor version that gives us the opportunity to compare how good the "after" looks compared with the before.  Now here in the quilting world we all love to show photos of of our finished blocks, quilt tops and the ultimate - a finished quilt but a couple of days ago it popped into my head to show what the before looks like.

Comments from the quilt judges:
Very one-dimensional, too many squares and rectangles.
Needs some oomph, some pizazz.
What were they thinking when they chose this fabric?
Before
Wow, this baby has it going on....it jumps out at me.
I want to take it with me to my LQS.
This one has me going in circles...in a good way.
Amazing transformation - didn't think it was possible.
After - Flying Geese Pinwheel Block
Again - more comments:
Where is this one going?
There is no way those fabrics are going to work together.
That yellow/blue square in the middle is the ugliest thing I've ever seen.
Before
It's working for me...
The interplay of the four quadrants against each other makes for pleasant block viewing.
The points match up perfectly...although the stray threads need a little help.
After - Boxed In by Faith Jones
And the winner of the best makeover by the quilt judges is.....The Flying Geese Pinwheel Block.  Of course I get to pick my favorite, right?  Haha
By the way, who cares about the Super Bowl...it's World Nutella Day!

Be safe, have fun - enjoy your day!
Susan

Saturday, February 4, 2012

HQ Podcast Episode 21 Signature Quilts

This past Wednesday I recorded and uploaded History Quilter Podcast Episode 21 where I spoke about Signature Quilts.  The episode is now available on Podbean and iTunes. You can also listen directly from this website by clicking on the Podbean link to the right.

What is a Signature Quilt?  Signature quilts are quilts that have names inscribed on them either with pen or embroidery and are created with fundraising, fellowship and memory as their goal.  The International Quilt Study Center and Museum located at the University of Nebraska-Lincoln has a new exhibit called What's In A Name? Inscribed Quilts which I talked about almost exclusively in regards to Signature or Inscribed Quilts.  The link for the exhibit is here.

Have you ever participated in a Signature Quilt project? Do you have a Signature Quilt from the past?  Please comment below or send me an email if you have any experience with Signature Quilts.

In the three days between uploading the podcast and publishing this blogpost, I have already received one comment from listener Jane who sent me a link to a fascinating Quilting Board forum thread about the Signature Quilt top featured below.  The thread is called Paris Texas 1931 Friendship Quilt Top.  Go check out the link here to read how quilters/genealogists are attempting to help BrendaY, to identify whom the signatures belong to on the quilt top.

Paris Texas 1931 Friendship Quilt Top
Recipes:  Three-Cheese Lasagna With Italian Sausage
The 241 Tote by Anna Graham of Noodlehead that I made about a week ago:
241 Tote by Anna Graham of Noodlehead
Come back tomorrow for a little "before & after".

Have a wonderful Saturday wherever you are~
Susan